Classical Villa Construction
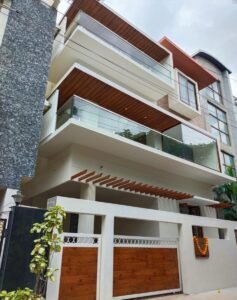
Classical Villa Construction in Bangalore
Construction of this classical luxury villa is now taking place in Bangalore. This 2400 square-foot north-facing plot is rectangular in shape. This villa design that we created has a G+3 structure. The house has two entrances, one on the northern side and the other on the western side.
Excavation Marking:
Determining the amount of soil existing and removing undesirable bushes, weeds, and plants are the first and most crucial steps in the excavation process for this classical villa Construction.
Before digging can start, the ground must be marked with excavation lines, center lines, and other markings, a procedure known as ground tracing or putting out. The measurements of the grids are marked with numbers and letters. It makes site marking easy by representing the drawings of gridlines. These grid lines fall on the excavation and footing due to their alignment.

A maximum of 4 and a minimum of 2 benchmarks are marked in the corner for level measurement purposes. These marks are attached to strong structures such as plinths, roads, or trees. The trail is covered in a layer of lime powder. The sketch and benchmarks are used as a guide to determine the depth of the excavation. Both human and mechanical methods of excavation are used, depending on the resources at hand.

The removed soil must be either hauled away from the site or piled close to the excavation hole. In order to prevent the earth from sweeping into the pits as a result of rain or other factors, a minimum gap of 1m must be kept between the stocking of extra soil and the pit.

Proper anchoring must be done to hold loose soil if the site is situated in an area with loose soil. For security purposes, the building’s overall perimeter must be sealed.
Footing Rebar Checking:
Concrete foundations have steel reinforcement as a key component. Due to this, putting concrete is just as important as properly positioning horizontal and vertical rebars in a footing. To maximize the effectiveness of the footing, considerations regarding the placement, size, cover, tying, and tolerance in steel reinforcement are taken. Activities such as looking for concrete cover, identifying, tying, and supporting the reinforcement, etc. are required for the placement of reinforcement in the footing.

The steps below can be used to visually inspect the reinforcing bar on site.
- Every meter of steel has a manufacturing seal, so look for it.
- Rust shouldn’t be present on the bars.
- Evaluate the bundle’s steel weight.
- Verify the length of the rods to ensure equality.
- Examine the steel’s general quality.

To prevent corrosion, reinforcement for the footing cannot be buried in the ground or on hard surfaces. Even placing rebars above a layer of freshly poured concrete before pouring more concrete is unacceptable since the rebar’s location may vary as the concrete hardens.

It should not be possible to add reinforcement to freshly laid concrete layers or to move bars or welded wire reinforcement as concrete is being poured. When reinforcing is placed on the subgrade and pulled up during the pouring of concrete, this risky technique is known as “hooking” in slab construction. Spacers have typically been an optional component of vertical concrete (wall installation).

Plinth Rebar Checking:
The purpose of a plinth beam in a frame building is to connect all the columns. It minimizes their effective length and makes them less thin. Plinth beams serve as a bracing or tying element and are typically utilized when the foundations are a little deeper. Another reason to include plinth beams is to prevent differential settlement in a building. This is because the plinth beam beneath the wall will then be carrying all the wall’s weight.
Verify that each column is cast two inches above the plinth or, if necessary, up to the bottom of the plinth beam work method. Verify that all of the lap lengths for the bars above the plinth are sufficient. Check the column faces on which the plinth beam is supported.

The reinforcement bars must be free of loose debris, corrosion, sludge, oil, slurry, etc. According to structural drawings, the steel bar’s grade (for both main reinforcement and transverse reinforcement) must be verified. Determine the Grid Name (such as Grid A, B, C, 1, 2.3, etc.) and Beam Name (such as B1, B2, etc.) before going to inspect the reinforcement.

It is standard practice to examine the formwork before allowing the placement of reinforcement when the ground beams and plinth beams are ready for concreting, or when the reinforcement is fully tied up. However, the optimal practice would be to inspect it in two phases, or This is required because some formwork flaws are difficult or impossible to fix once reinforcement has been installed. Examining the reinforcement. Therefore, it is normal engineering practice to examine the formwork before placing or tying reinforcement.

In conclusion, this classical ongoing house construction has many steps involved. This is just the start. For more updates on this Classical Elite Villa Design check our Architecture Portfolio and for more updates on this classical villa construction, keep visiting this portfolio.